Showing posts with label WORKSHOPS. Show all posts

Saturday, July 24, 2010

Watercolor Pencil Week 9 - 12

Week 9 - and the end is coming nearer and I don't want it to because I'm learning so much. This week we learned about shading. Our project was to do the tulip. As an added "fun" project we did our own version of a sample that was provided. So below is my version of "Castle of Dreams."


Week 10 - we were to finish our "Daisies". We had drawn them in a earlier lesson and learned about "masking". We used masking fluid to cover them so that we would do the background and add the water to the vase. This is my finished product.


Week 11 - and we were left to our own devices. So I began with "The Nest". I went back and redid a picture that we did in the beginning. If you go back to an earlier lesson you'll see the first one I did. Some improvement but as with anything "practice, practice, practice!" The next picture I did was the same method when I did the "fish". This time I went for the desert. I think my cactus needs a little work. I never said I could draw! The 3rd picture I thought I would attempt a birdhouse in a tree. The more I drew the tree the more it looked like something under water. Went with fish. Again. The last picture of the butterflies was a little more involved since I used some masking technique but it was a lot of fun.


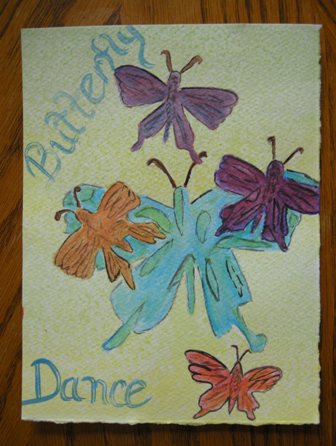


Week 12 - and sadly at an end. It was such a good time and I learned a lot. We didn't really have a project to do so I decided to take some of the things I learned plus some suggestions given and put them together. I did "pouring, saran wrap, candle resist technique". I only wish I had gone a little darker in color.
And that my friends was my watercolor pencil experience.

Thursday, July 3, 2008

TEW Workshop

These are the last 2 lessons of the book. Sad that it's ending as it's been a lot of fun. Definately got me going outside my box! The flower card background was done with glossy white, watercolor crayons and water. "Musician" was done with white glossy and inks then stamped over when dry.

Wednesday, July 2, 2008

TEW Workshop

This lesson required us to do some embossing and "staining" if you will on mulberry paper. The dragonflies were stamped and embossed. The colors were added then the whole sheet was ironed to remove the embossing.
"Journey" was done using glossy white and a resist technique also.
My "Piano Hinge Book". Made with glossy white paper and inks. Used wire and beads to hold it all in place. Mizuhiki cord as the closure.

Friday, May 30, 2008

ATC and TEW Workshops

WOW! I finished the ATC workshop. I'm excited because of all the new things I learned from it. Only a few more lessons in the TEW workshop. This was stamped on glossy with a couple different "coffee" stamps then cut into panels.


This card is called "Chasing Diamonds". I used a rubber "mat" from Rubber Nature Art then cut the stamped paper into diamond shapes.


This is my "Dream Box". I used 3 different colors of ink and did the DTB (direct-to-box!). Then stamped over that with my shell and word stamp. Painted the "legs" and "handle" with metallic blue acryllic paint. Did the tag same as the box, added fibers and small beads, and attached it to the lid.

Thursday, May 15, 2008

ATC and TEW Workshops


ATCLesson 16
This is my Accordian Book. I used bleach on black paper then stamped over some of the pages. I then used ribbon where the folds are. It was a lot of fun to make.

TEWCh4Ls1
I created this using a shadow stamp and masking tape. Just put the tape on the ink pad being used then put the inked tape onto your stamp (in this case I used a shadow stamp). I used 2 inks in this case.

Wednesday, April 30, 2008

ATC and TEW Workshops


This week was a break from the TEW. For the ATCs I chose to do the digital. The flower is from the side of my house. You can't tell very well in the picture but the flower's background is swirled with gold.The lighthouse is located in St. Augustine, FL.

Monday, April 21, 2008

ATC and TEW Workshops

Lesson 14 - This lesson was a diptych or triptych. These are "mini" works of art in 2 or 3 parts. They were fun to make and I enjoyed them.
TEWCh3Ls6 - The shaving cream method. This is always fun because you never know how your colors will turn out or what design they will make. I had done this technique before so I used one of the pieces I had left over.
TEWCh3Ls7 - This is also a shaving cream background, laminate sheet, permanent ink, dye inks and stamps. Make your background, stamp on the laminate and secure to cardstock. You can't tell but the "blue" card does have some light blue shells stamped on it.

Friday, April 18, 2008

ATC and TEW Workshops

The next few lessons we were given a choice of techniques to use. These are Ultra ATCs. For the first ATC I chose a folded one. I stamped the outside with the gate and colored it with color pencils. Then I cut around the top of it to expose some of the inside.

Lesson 13

TEWCh3Ls4
This TEW called for black glossy (which I used white glossy and DTP black), alcohol inks and Pearl Ex. I covered the paper with black, rubbed spots of the Pearl Ex, applied the inks to an applicator then "pounced" it over the powder to liquefy and spread them making a variegated background.

Monday, April 7, 2008

TEW Workshop

This is a ceramic tile. We used inks, stamps and tissue paper. It called for floor finish (like Future) but I didn't have any. So I used Modge Podge and a spray sealant. Alcohol inks were dabbed onto the tile, images were stamped onto the tissue paper. I laid that on top and put the Modge Podge on using a foam brush. Smoothed out the wrinkles and allowed it to dry. Then sprayed it with the sealant.


ATC workshop on break this weak

Monday, March 31, 2008

ATC and TEW Workshops

Ls11 Ls12

For Lesson 11 I stamped my lady on a manila folder and cut it down to ATC size. Then I applied ink to a piece of Mica that we were to use. I attached the 3 flowers where she has flowers in her hair. Then attached the "mystere". Lesson 12 was VERY interesting! I had never heard of Friendly Plastic. It certainly has its "issues". Try as I might I could NOT get it to lay completely flat! I melted a piece of multi-color purple (middle) and plain purple (sides) together. Took my butterfly stamp with ink and stamped into the still warm plastic. Added six eyelets to get the holes (which they ended up falling out and I just left it!).


Ch3Ls1


The background papers for these cards was already printed with Japanese calligraphy. I then took a transparency and stamped the "ladies" on that. Added the color to the transparency using a "pouncing" method to apply the alcohol inks that I used.


Ch3Ls2
These cards used a clear resist technique whereby you add clear resist to Cut "N" Dry foam. Then add colors to the areas where there isn't any clear resist. Next you "drag" the foam over the glossy paper. Apply more ink with a cosmetic sponge and randomly stamp your image.

Monday, March 17, 2008

ATC and TEW Workshop

Time to get caught up on my workshops! They've been a lot fun and I've learned so many new techniques. Some of the were a lot of fun and I would probably use again. Then there were those that I might try again and of course there were those that I really didn't care for. Lesson 8 was done using fibers and embossing powder (first picture). The second is a transfer onto cloth. Lesson 9 is an image transfered onto cloth then sewn onto a cloth background. Lesson 10 was down using metal tape and alcohol inks.

Lesson 8 and Lesson 9

Lesson 10

Monday, February 25, 2008

ATC and TEW Workshops


LESSON 7
The first 2 ATCs were done using a technique called Resin Fresco. Apply embossing ink randomly then sprinkle with embossing powder. Melt with heat gun but don't overheat because you don't want it to turn glass like. Brush with gesso. When dry, drybrush acrylic paint over card and then stamp or decorate.

TEWCh2Ls2
This technique in Texture Effects was created using dye inks, metallic inks, acrylic paints, fibers and stamps.

Monday, February 18, 2008

WORKSHOP

Chapter 2 Lesson 1
This card is made using the resist effect, masking off an area and continuing with the combination of colors. The clef was made from Mizuhiki cord. There is also a small piece of Mica on top of the clef. The embellishment on top was made using hot glue, small rubber stamp and then adding color once it was cooled.


ATC workshop is taking a break this week so will be adding that back again next week.


Wednesday, February 13, 2008

WORKSHOPS

Lesson#6
The first card was made using the emboss resist technique. The other 2 were done using paper scraps, glueing them down then applying embossing powder in the blank areas.


This clock was an optional exercise in the Texture Effects workshop. We were to use acrylic clock parts but I couldn't find any and didn't want to order. SO, being what I consider a resourceful person I purchased a sticker clock face and actual clock arms. I followed the project using the techniques just stamping on a transparency instead of acrylic. I then mounted it to a piece of cardboard.


Lesson#Optional

WORKSHOPS

Lesson#5

In this lesson we were to do a transfer (Beauty) and the second ATC was using Fun Foam. For the transfer our choice was to use either water or gel medium. I used water for this one. Fun Foam was Fun! Glue down the foam then gesso over it the whole ATC. Pounce on paint over the whole card. When dry stamp over card and fun foam.

This card was made using the resist technique (Clear Resis Pad) and inks. The image was then cut into small strips, mounted on a small piece of cardstock so that it could be staggered. Then the whole piece was mounted on cardstock.


Lesson#4

Monday, January 28, 2008

More WORKSHOP

Lesson#4
This lesson was fun to do. "Wild Times" was created with a phone book page (went to the back of the book for that one!). We were to use acrylic paint and glazing medium for color. I added stickers and went around edge with marker. "Stars" was created with string, gesso, acrylic paints and pieces from a piece of nostalgic paper. "DragonFly" was created using white tissue paper glued to cardstock. Gel medium was applied then I used metallic acrylic paint. Applied stickers.

TEW Lesson#3
More glossy cardstock and resist technique. To get the stripe effect we put down masking tape, used our inks, moved the tape and continued coloring in that manner. I then came back with a contrasing ink back over the leaves.

WOW! Now I'm caught up on posting lessons!